
Terrain Build- The Temple of Shadows
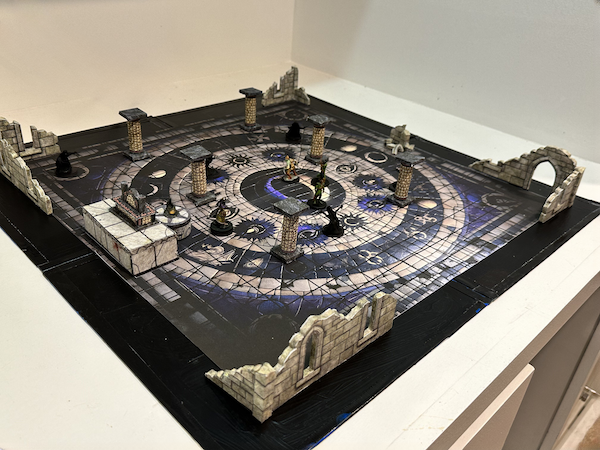
This build was inspired by a module I ran for Adventurer's League, DDAL-DRW11 Shadows in the Stacks, in which our intrepid heroes must do battle with insidious shadowy cultists in the ruins of their temple of evilly-evilness. The encounter calls for several shadar-kai with teleportation and space-bending abilities, as well as several strength-leeching shadows (1 per PC) to round out the action economy. It's a somewhat complex combat encounter to run, mechanically, since the villains have a couple of interesting tactical choices to make, each, per round. On top of the combat itself, it features a sort of "keep away" narrative goal where the PCs want to stop the cultists from throwing things in the temple fire. In all, a pretty memorable scene, so I wanted to do it justice at the table, and figured it would be best to lean into the light/dark constrasts and really emphasize the shadowy aspect of the Tenebrous Creed cult.
I actually like how the Shadows turned out:
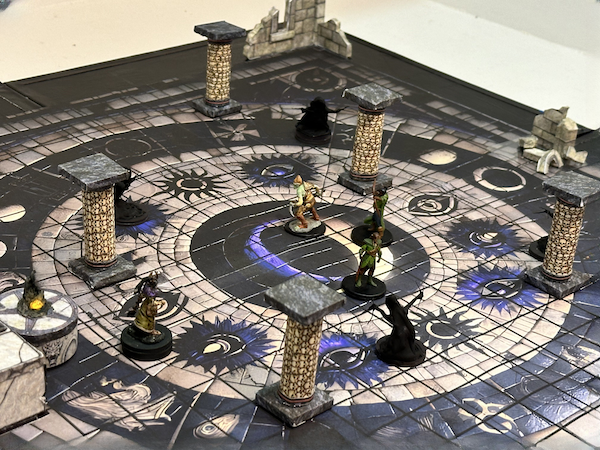
I didn't have any Shadow miniatures handy, so I applied layers of hot glue to a magnet round and essentially sculpted them before quickly painting matte black. In all, I think it took me about 10-15 minutes total per figure. I thought about making the paint job more interesting (say, dry brushing to pick up surface highlights) but I actually think that they "pop" better in matte black, almost like negative space looming against the dark terrain.
Anatomy of the Build #
The bottom-most layer is my sheet-metal base, black-side up.
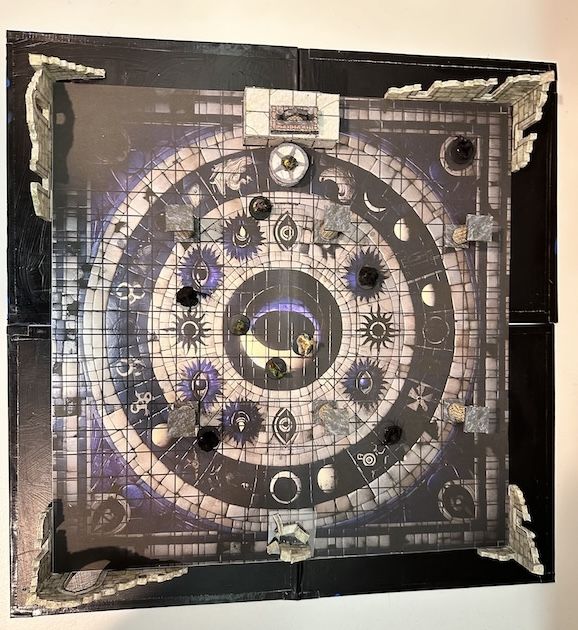
Next, a custom-printed battle map graphic depicting the mosaic floor of the ruined Temple of Shar, goddess of night, overlaid with a 1" tactical grid. This was printed onto copy paper and adhered to the back of magnetic 8.5x11 sheets (affiliate link).
Third, some Crooked Staff scatter terrain rounds out the aesthetic and gives this map some depth and tactical interest:
- Ruin Walls (episode 82)
- Tea Light Brazier (episode 48)
- Skull Decorations (episode 37 - altar, columns)
Crafting the Battle Map with AI Tools #
AKA How to Use Thousands of Free VTT Maps for In-Person Play #
This workflow is really the heart of the build, and I wanted to highlight some tools I used here, because I think there's a lot of creative potential waiting to be tapped in these methods.
Custom Image Generation with Stable Diffusion
To create the initial image of the mosaic tile floor, I used stable diffusion, specifically DALL-E, via ChatGPT-4. If you'd rather not pay OpenAI to access ChatGPT-4, there are other options with free tiers, such as MidJourney, Mage.space, etc. You can probably also use the free ChatGPT-3 model to produce a prompt you can copy/paste into a stable diffusion image generation tool, if you wish.
I used a prompt like:
"Create a top-down view of a tiled, ruined temple floor.
The temple is dedicated to the dark goddess of night, Shar.
The tiles are arrayed in a mosaic depicting themes
appropriate for Shar. Shadows abound. Dark color palette.
The final image should be approximate a 20x20 inch square
when printed."
Now, ChatGPT can only output images with a maximum size of 1024x1024 pixels. So, that bit in the prompt about the image size probably isn't strictly needed, but I did note that the model produced a very square and symmetrical image.
As an alternative for this kind of craft, you could consider searching for free VTT maps, and simply pick one of those. It likely already has a grid on it, which would eliminate the next step...
Adding a Grid Overlay
There are lots of different ways to do this, but I was interested in finding free tools to do so online, so I found and used this tool: Photo Multitool.
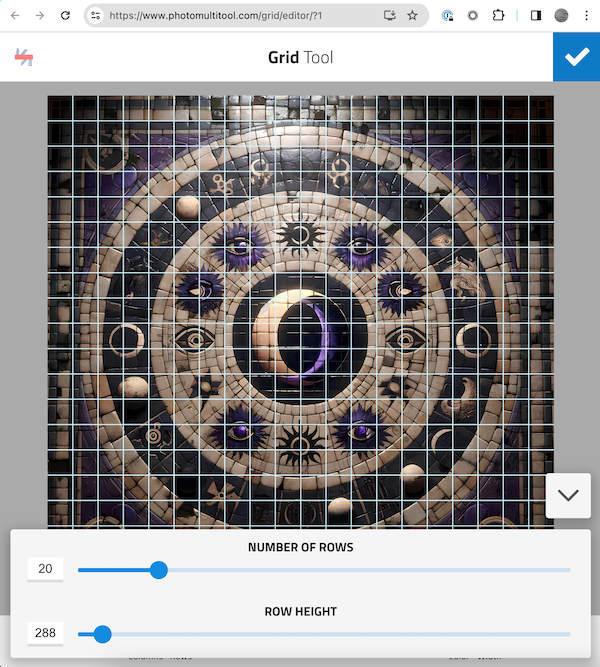
Great tool. Just set the desired number of columns and rows for your grid (we'll take care to size this properly for 1" squares later), set the line width and color and save!
In my case, I didn't like how busy the grid looked when using light colors for contrast, so I went pure black. It means that the grid is harder to follow in the shaded areas, but I kinda like that for this theme and setpiece.
Enhance!
Great, now we've got a nifty-looking 1024x1024px image. Not big enough to blow up and print at 1" grid scale. Enter AI Upscaling tools. These models do a good job of interpolating existing image colors and shapes to effectively double or quadruple the size of an original image. We finally have the 'Enhance!' button we've been seeing in movies for years... I tried several of these, and they were roughly the same in terms of speed and maximum input size, and all offered free tiers (usually they capped you at 2 or 3 uses per day). I ended up using imgupscaler.com. Just upload, click 'enhance', and then 'download'. Done!
I was able to do this process twice, turning a 1024x1024px image into a 4096x4096px image that looked great.
Fit to Print
If you want truly professional results, you should probably take this image to Kinko's and have it printed on large format paper, perhaps even glossy photopaper. I went a DIY route and used a service that turns images into arbitrarily large 'posters', one 8.5x11 page at a time: PosteRazor. After printing, you can trim the pages and paste them together to make your final poster. To use this, upload your image, set your orientation (portrait is usually fine) and margins (accept defaults is usually fine), then specify how many pages you'd like your image to span. Here's the slightly tricky part: Posterazor will quite happily accept decimal values for the 'number of pages', so you can fine tune your poster size, say 2.345 pages across by 1.899 pages down, etc. Doesn't have to be a whole integer value, which is key for our purpose here, since we care that the final print will have a 1" grid.
Probably there's a clever method to exactly measure the pixels of a grid square on the original image, divide that by the DPI resolution of the printer (mine's 300), and use a ratio to figure out the exact decimal page setting to get a printed 1" grid. Well, that's what I tried, anyway. My first print didn't work out exact. It was slighly off, probably because I didn't account for the printer margin settings properly.
So, if you do this kind of thing, here's what I recommend:
- Use the Posterazor tool to create a PDF that's, "ballpark", the size you want. Note this 'number of pages' decimal value.
- Print only the first page of the PDF, in black and white to save ink (you'll be recycling this page).
- Measure the printed grid with a decent ruler, and come up with a decimal value in inches.
- Divide the value from step 1 by the value from step 3. Use this new value in Posterazor to get an accurate PDF.
- Download and print all pages of the new PDF. Be careful to change only the color setting in the printer settings. Cut them out and assemble!
This technique can be used to create large fantasy maps, and obviously, posters, too. I find that for some prints the seams where the edge of one paper lays on top of another are noticable, and for others, like this build, it's invisible. The dark colors and busy details completely disguise the fact that the surface of the battle map is not completely uniform. For cardstock, this discrepancy is magnified, and fairly distracting. Your mileage may vary.
Just Add Magnets
If you're using a metal base then once the final poster is ready and trimmed, apply craft magnet sheets to the back side. The adhesive on these is tremendous. This cannot be overstated. You'll want to carefully peel off a small 'window' along one end of the sheet, just enough so that you can fold the waxed paper on itself, leaving an area you can exactly place and stick, then slowly peel the remainder of the sheet away, adhering to the underlying poster paper as you go. Any creasing or bunching in the poster paper will be permanent once you've started to apply these things, so take your time.
Another reason to take your time: by lining up the magnetic sheets carefully, they will naturally form a 'crease' that will allow the map to fold cleanly along the edges of the magnets for storage!
All flat scatter terrain surfaces in this build (the columns, altar, tea light, and walls) have craft magnets stuck to their bottom surface. Though relatively weak, they adhere quite strongly to the ferrous sheet metal base, so even the thin, 1/4" strips of craft magnet on the ruin walls hold them quite solidly, and when they abut the edges of the mosaic battlemap magnet layer, they're basically budge-proof. Awesome.
The story is a little different for the columns and scatter terrain on top of the battle map layer. I find that the scatter terrain will stick to the battle map with the ferrous sheet metal underneath better than they would otherwise, but not by much. Also, their orientation/placement matters a bit:
The magnetic sheets have tiny rows or layers of North/South magnets in them, so they don't always want to adhere to themselves, depending on placement and orientation. If you take two of the craft magnet sheets and begin to slide them against each other, you'll feel a subtle 'click, click' as the magnet array polarities move in and out of alignment past one another.
When using a battle map with a magnetic base like this, I found that I occasionally had to turn a column 90 degrees to get its craft magnets to stick strongly.
TL;DR: Consider using stronger magnets if budge-proof placement is a concern for scatter terrain on top of a magnet sheet layer.
Closing Thoughts
I feel like being able to create arbitrarily good-looking VTT-style battlemaps in a minute or two with AI tools is a superpower. Plus, knowing that I can pull existing VTT maps from DMsGuild or other sources and turn them into table-ready playable surfaces quickly is great.